Die Kommandozentrale für Ihre Finanzen
Zeigen Sie sofort den Gewinn an, behalten Sie die Amazon-Gebühren im Auge und bleiben Sie über den Finanzstatus Ihres Unternehmens auf dem Laufenden.
Erste Schritte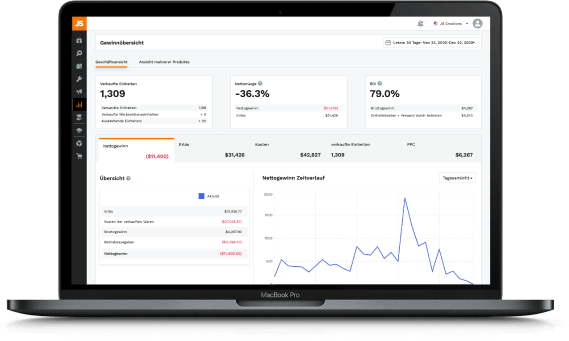
Was ist die Verkaufsanalyse?
Bei der Verkaufsanalyse werden alle Ihre Amazon-Verkaufsdaten in Echtzeit organisiert und verfolgt, damit Sie sich auf gewinnorientierte und kostensparende Strategien für Ihr Unternehmen konzentrieren können.
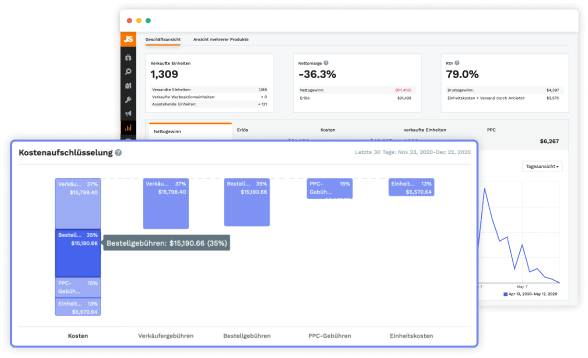
Zeigen Sie aktuelle und vergangene Daten mit Gewinnübersicht an
Betrachten Sie Umsatz- und Gewinndaten aus Unternehmensperspektive oder auf einem Dashboard mit mehreren Produkten. Sehen Sie verkaufte Einheiten, Nettomarge, Rentabilität, Gewinn u. v. m. an. Vergleichen Sie den Umsatz innerhalb eines bestimmten Zeitraums mit benutzerdefinierten Datumsbereichen, um zu verstehen, wie sich Werbeaktionen, Rückerstattungen und andere Variablen auf Ihren Gewinn auswirken.
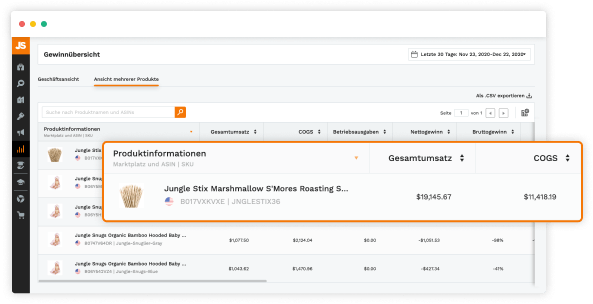
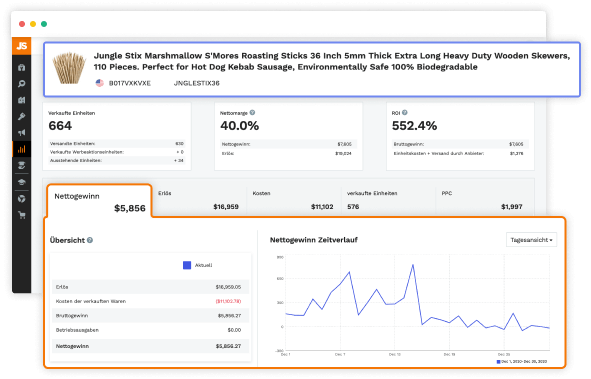
Sehen Sie sich Produktdaten an
Sehen Sie sich die Performance eines bestimmten Produkts anhand von Produktnamen, ASIN oder SKU an, um Umsatz- und Einnahmendetails, PPC- Kampagnendaten sowie Anbieter und Versandkosten zu analysieren. Verfolgen Sie eingehende FBA-Sendungen, damit Sie wissen, wann sie das Versandnetzwerk von Amazon erreichen.
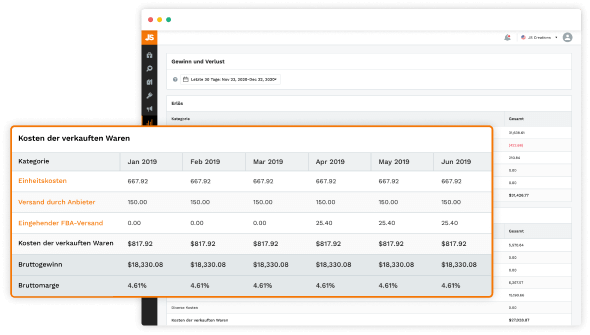
Sehen Sie sich die Finanzkennzahlen an
Erstellen Sie eine professionelle Gewinn- und Verlustrechnung für Ihr Unternehmen. Lassen Sie sich kritische Kennzahlen wie Einnahmen, versteckte Gebühren, Produktionskosten (COGS) und Betriebsausgaben nach ausgewählten Zeiträumen anzeigen, um Fortschritt, Trends und Steuern im Blick zu behalten.
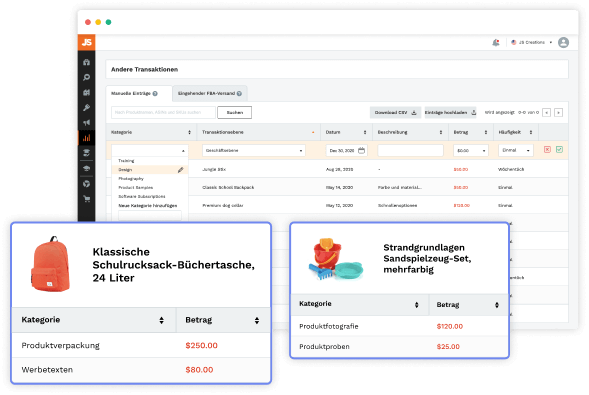
Passen Sie Ihre Ausgaben individuell an
Dokumentieren Sie Ausgaben wie Kosten für Werbung, Gehälter, Versand und Lagerhaltung oder andere allgemeine Gebühren. Fügen Sie für Ihr Unternehmen benutzerdefinierte positive oder negative Einträge hinzu.
Evaluieren Sie Ihre PPC-Kampagnen
Messen Sie Ihre PPC-bezogenen Verkäufe und Ausgaben, um Informationen für zukünftige Kampagnen zu erhalten. Vergleichen Sie den Umsatzverlauf aus PPC- Ausgaben mit organischen Verkäufen und zeigen Sie PPC-Ausgaben auf Produktebene oder für einen Datumsbereich an.
Verfolgen Sie Ihren finanziellen Erfolg mit Jungle Scout
Jungle Scout bietet eine 14-tägige Geld-zurück-Garantie.
Registrieren