 No Comments
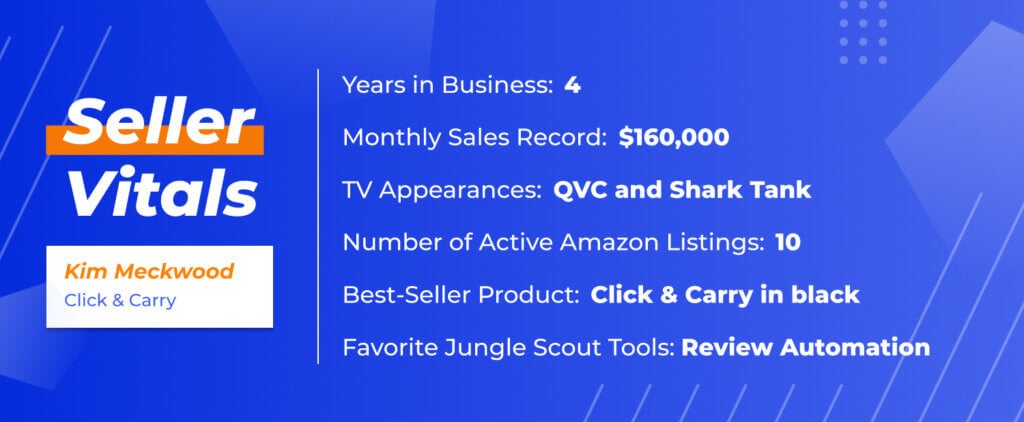
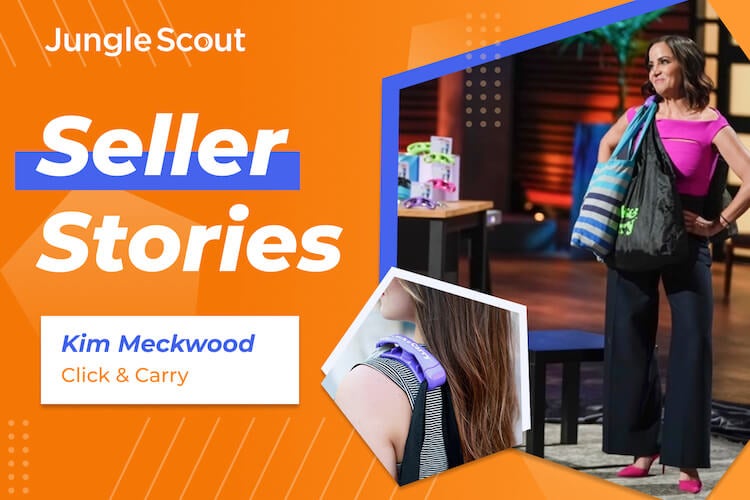
Every so often, you come across a product so useful that you can’t believe it wasn’t invented sooner. That was my reaction to Click & Carry, the hands-free bag carrier created by inventor and entrepreneur Kim Meckwood.
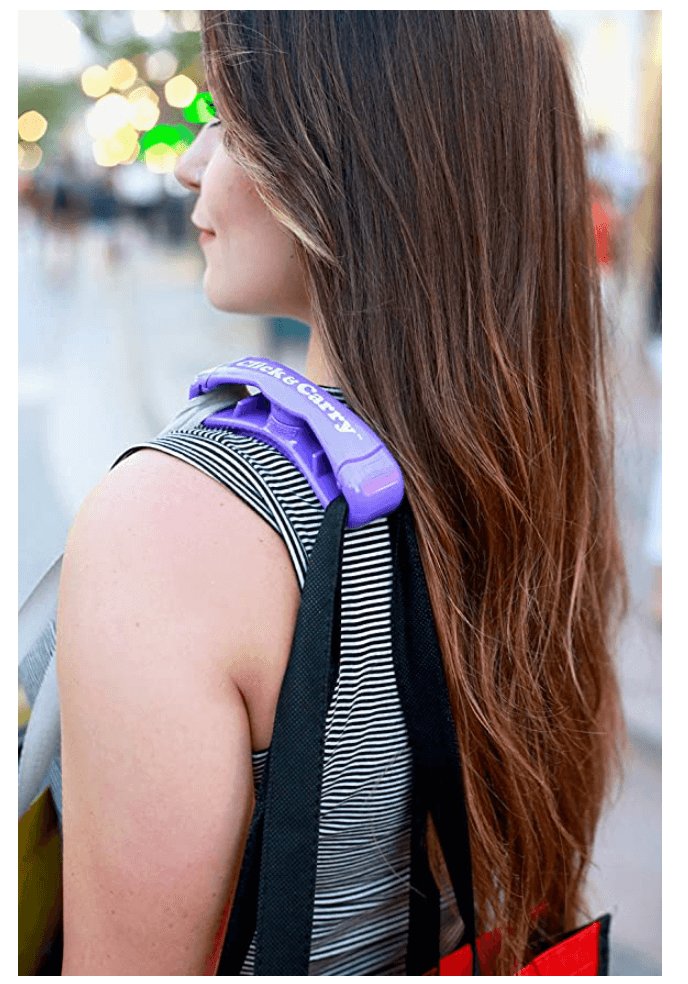
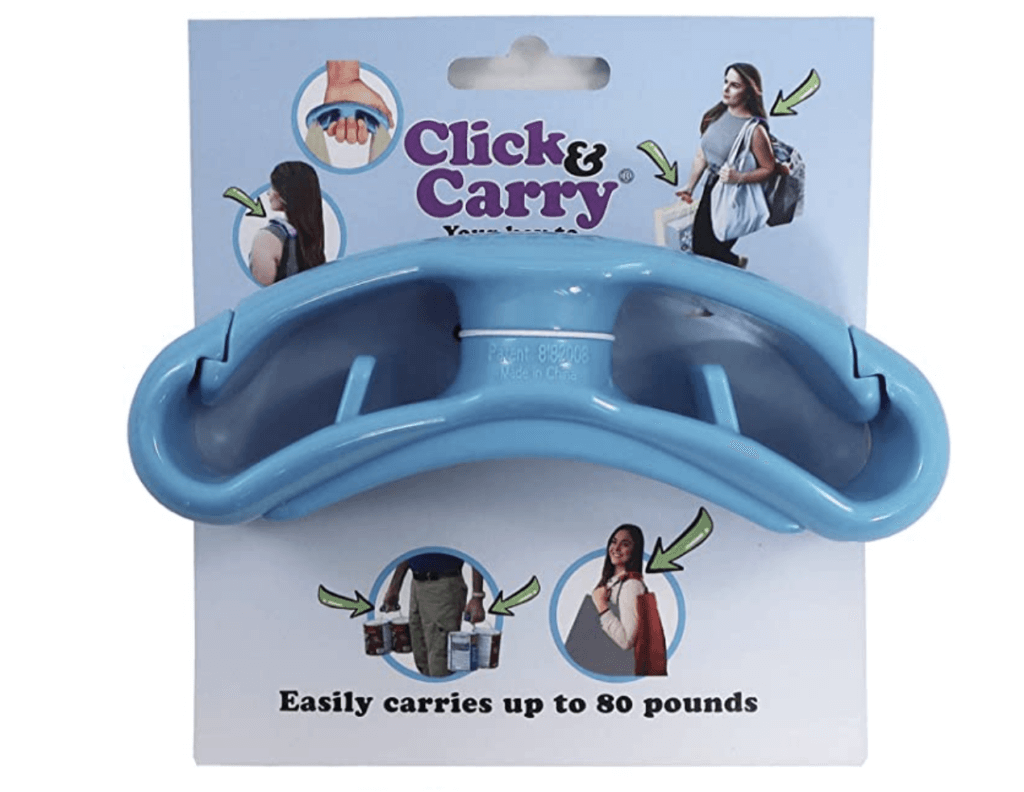
As handy as it is unassuming, the Click & Carry is a sturdy little device shaped a bit like a boomerang. It twists open to allow users to load multiple handled bags onto its hooked frame, and then twists shut with a satisfying click. It can then be placed over the shoulder, where a cushioned, no-slip grip keeps it in place as the user transports a full load of groceries or other cargo.
@clickandcarry ONE☝️ Trip or BUST! ☝️ Be HANDS-FREE 🙌🏿 with @ClickandCarry #clickandcarry #groceryshopping #qvc #amazon #kroger #pride
Kim’s tenacity and business savvy helped launch her product from a design school laboratory to the U.S. patent office, a major television appearance, and multichannel retail success.
We sat down with Kim to learn about how she developed her innovative product and brought it to Amazon and retail stores across the United States. Read on to learn her exciting story.
Life before FBA
Kim’s entrepreneurial streak appeared early in life. As a kid, she sold hand-painted rocks door-to-door and later was struck with her first invention idea: an anchored pool raft to ensure the perfect summer tan. Though someone else beat her to the patent, that retail ingenuity followed her into adulthood.
Ever the problem-solver, Kim came up with the original idea for Click & Carry in the wake of a breakup. Kim’s ex-boyfriend had always carried her groceries into the house in one trip — a sweet and time-saving gesture. Newly single and unable to pull it off alone, Kim thought that there had to be a better way to bring groceries inside.
At the time, she worked in medical device sales alongside neurologists specializing in movement disorders like Parkinson’s and dystonia. Kim often mused aloud to a colleague about creating a hands-free device to make grocery runs more convenient.
“One of the doctors was sick of me telling her about my idea,” says Kim. “And she said, ‘would you shut up and stop talking about it and do something about it?’”
Bringing Click & Carry to life
With her colleague’s encouragement, Kim took the next step to launch the Click & Carry brand. To do so, she teamed up with her colleague’s neighbor, who happened to be studying product design and had access to a 3D printer. Together, they developed nine different prototypes before Kim patented the Click & Carry design.
With her new, game-changing device in hand, Kim introduced the Click & Carry to the Container Store and local grocery stores. She also pitched the product at a housewares exhibition, where she earned features on QVC and, later, Bethenny Frankel’s television show, “Bethenny In Your Business.” Kim launched Click & Carry on Amazon in October of 2017, using Jungle Scout tools and the Fulfillment by Merchant method.
Her TV appearances and early success culminated in an episode on season 12 of “Shark Tank” last December — and a hard-won business proposal that could make Click & Carry a household name.
Kim’s business today
Today, Kim works on her business full-time and offers the Click & Carry in five different colors. She draws her main source of income by selling on Amazon. She also sells online at QVC and in a variety of brick-and-mortar retailers including Kroger, Lowes, and Buy Buy Baby.
In terms of profitability and customer feedback, Kim’s business is thriving. With the rise in online shopping due to COVID-19, more customers are discovering her products on Amazon. And thanks to the record-setting sales she earned after her Shark Tank episode aired, she’s halfway to reaching her projected goal of $500,000 in sales by the end of 2021.
What’s next for Click & Carry
Kim has big plans in the works to broaden her retail reach, including listing products in international Amazon marketplaces. She will return to TV in the fall to highlight a pink Click & Carry colorway for breast cancer awareness on “Good Morning America.” She also plans to release two new, complementary products to improve the Click & Carry’s functionality and increase its use across more industries. If she can achieve her goal of stocking the Click & Carry in 6,000 storefronts across the United States, she’ll be on track to grow her business to $10 million in revenue in the next three years.
Aside from her financial success, Kim loves the freedom and excitement of being her own boss. She also loves knowing she’s made her mark as an entrepreneur. “There’s nothing more fulfilling than putting your stamp on something and then introducing it to the world,” she says.
How did this entrepreneur make her dream product a reality? Let’s dive into the steps she took to grow her brand from retail mainstay to online bestseller to prime-time television darling.
She set her product apart from competitors
When Kim first began developing the Click & Carry, she ran up against a problem common to many new Amazon sellers: plenty of competition in her niche. She needed to differentiate her product from the crowd of other bag carriers, which ranged from hooked plastic handles to souped-up carabiners.
Keeping in mind customers with limited mobility, Kim saw the opportunity to create a truly hands-free version. Before moving forward with her idea, she wanted to make sure it would work. So she brought her prototypes to nearby flea markets for focus group feedback. Through this market research, Kim made a series of modifications until she arrived at the perfect, patent-worthy design.
Key design tweaks made the difference
In its earliest form, the Click & Carry was an open, double-ended hook with two carrying modes: handheld and over-the-shoulder. After customers pointed out that bag handles would often slip off of the hooks, Kim added a magnetic top piece to keep them contained. But the detachable top was also an issue — customers frequently lost it. To solve this, Kim changed the top to a fixed piece that rotated out of the hooks to allow for loading bags, and then clicked securely into place. She also added prongs to evenly distribute shopping bags across the length of the hooks.
These added functionalities allowed Kim to apply for a utility patent for the Click & Carry. The proprietary design set her product apart from the 16 other bag carry assist products that were on the market at the time, and ultimately allowed her to reach many more customers and industries than she expected.
Kim first marketed Click & Carry as a solution for busy moms, city dwellers, and people with movement issues — people who had difficulty carrying their groceries, kids, and other items all at once. “The ones that I love the most are when it helps people, especially older folks who have arthritis,” Kim says.
Soon after she began selling the device, she received testimonials and photos from customers who used it to carry a whole bunch of different things, like construction tools, paint pails, ladders, dry cleaning, and ski boots. She even found that it functions surprisingly well as an iPhone stand. These off-label uses inspired Kim’s new line of products, which she plans to debut soon.
She leveraged television appearances and expert feedback
Kim began her retail business the old-fashioned way: pounding the pavement to get her product into the hands of wholesale clients. As her business grew, her pitch targets graduated from grocery store managers to TV producers at national expos and entrepreneurial contests hosted by ecommerce experts like Jungle Scout’s founder, Greg Mercer. By putting her product on TV and in front of influential business leaders, Kim was able to build brand awareness and capital.
Over time, Kim found she could pitch her idea to anyone — even the famously cutthroat hosts of ABC’s “Shark Tank.” Kim knew an appearance on the show would mean more than just exposure to millions of viewers — she could earn life-changing funding, or even a business partner. She applied for the show seven times, and finally got a callback for an episode set to air in December of 2020. A few days before her episode recording, she recruited her best friend and sister to help her plan her wardrobe, calm her nerves, and prepare for any possible question the sharks could throw at her.
Swimming with the sharks
Kim describes her day on the set of “Shark Tank” as “the scariest and most exciting” of her life. “I pretty much didn’t sleep for about three or four days prior. I had a list of about 50 to 100 questions that I was memorizing…the anxiety level in preparing for that was just crazy,” says Kim.

At the end of her taping, Kim emerged victorious — she had struck a deal with sharks Mark Cuban and Barbara Corcoran. She also received a big sales boost on Amazon when her episode aired on TV: in December of 2020, she sold $160,000 on Amazon — eight times her average monthly sales.
She sells the Click & Carry in physical stores and online
To get Click & Carry into every household, Kim has taken on both digital and traditional retail channels. Click & Carry’s presence in both online and physical spaces helps establish it as a legitimate, vetted product — and effectively retargets customers who saw it on Amazon or at the grocery store but hadn’t yet made a purchase.
Brick-and mortar retail helped close gaps
Selling in stores has helped Kim overcome a serious obstacle on Amazon: customers simply aren’t familiar with the concept of bag carriers — and don’t know how to search for one online. “The problem with Click & Carry is that there aren’t very many great search words,” Kim says of her initial struggle to market her product online.
That’s where Jungle Scout’s Keyword Scout comes in. Kim used Keyword Scout to discover the search terms that would lead Amazon customers to her product even if they’d never heard of Click & Carry or the bag carrier niche. “I received all of my great search words from Jungle Scout,” says Kim.
Kim’s tips for Amazon sellers
If there’s one lesson sellers can learn from Kim’s journey, it’s to ignore the naysayers and put yourself out there! Kim knows there are a lot of scary things about solo entrepreneurship: fundraising, asking for feedback, and prioritizing your dream over your day job pose real challenges. She’s learned the value in being daring with your approach to business, and encourages sellers to “be scrappy” and just go for it — especially “if you’re not tied down by a mortgage.”
Kim also advises sellers to invest in customer feedback. Listening to what customers want and like about your product is important during product development and later as you scale your business. Kim once encountered a competitor who tried to sabotage her business by leaving fake negative reviews on her Amazon listings. To counteract the impact of these low ratings, Kim used Jungle Scout’s Review Automation tool to automatically ask for a review from each of her real customers. This strategy helped her jump from 335 star ratings and 100 written reviews on Amazon to 2,116 ratings and 397 written reviews. Today, Click & Carry has a 4.5-star rating on Amazon.
Most importantly, sellers should always build brand awareness. An early rejection from a Wegman’s sourcer convinced Kim that in order to win retail contracts, people needed to know what Click & Carry could do. Getting her product into people’s hands through her flea market field research and influencer marketing on social media has helped spread the word about her brand across different channels throughout her company’s lifetime.
To learn more about Kim Meckwood and Click & Carry, visit her website and Instagram.
Want to start your own FBA success story? Check out How to Sell on Amazon FBA, our step-by-step guide to launching a private label Amazon business.